Computer and Document Encryption
Encryption for OHIO Computers
It is everyone's responsibility to protect and secure data stored on OHIO devices from unauthorized or unintentional data exposure.
Device Encryption reduces the risk of exposing confidential data through stolen or lost equipment. By encrypting and protecting University-owned computers, OHIO is adopting an industry best practice that minimizes the risk of data exposure. If a device is lost or stolen, and we can prove that the data on it is encrypted, we can be sure that bad actors have not accessed it.
Encrypting your computer provides an additional layer of protection to the data saved to it if the device is lost or stolen. If your computer is not already encrypted, please follow the instructions below to use your operating system's built-in software for encryption.
- Windows: Bitlocker
- Mac: FileVault2
How to Tell if a Computer is Encrypted
If you are unsure about whether your computer is encrypted, follow these steps.
Windows
- Navigate to Control Panel
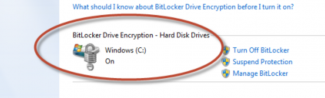
- Choose BitLocker Drive Encryption
- If your hard drive's icon includes a lock, your device is fully encrypted
Mac
- Navigate to System Preferences
- Select Security & Privacy
- Select FileVault
- If the resulting tab says that FileVault is turned on, then your computer is encrypted
If you have any issues or questions about encrypting your OHIO device, visit the Technology Help Center to submit a ticket or connect with the IT Service Desk.
Document Encryption
Encrypting at the file-level is a quick and easy way to ensure that your data is secured when stored or during transit, such as when being sent through email. If you are sending the encrypted file to someone, remember to securely share the password to the file with the recipient (e.g. in person or via telephone). Here we've shared a few common applications and how to use their built-in features to secure your files.
Acrobat Pro DC (for PDFs)
- Open the PDF in Acrobat DC.
- Go to File, then select Protect Using Password.
- Select whether you want the password to be required for Viewing or Editing the PDF.
- Type the password you want to use twice. The password strength indicator will let you know if the password you selected is weak, medium, strong, or best.
- Select Apply. Acrobat will display a confirmation message.
Word (for .doc, .docx, and other supported file types)
Windows:
- Go to File and select Protect Document, then Encrypt with Password.
- Type a password, and then type it again to confirm it.
- Save the file to ensure the password takes effect.
Mac:
- Go to Review, and select Protect Document.
- Under Security, you can select whether a person will need to enter a password to open the document, modify the document, or both. Enter each password again to confirm.
- Click OK, then save the document.
Excel (for .xlsx, .csv, and other supported file types)
Windows:
- Go to File and select Info.
- Select the box for Protect Workbook, and choose Encrypt with Password.
- Enter a password, then select OK.
- Confirm the password in the Re-enter Password box, then select OK.
- Save the file to ensure the password takes effect.
Mac:
- Go to File, then select Passwords.
- Enter a password in the Password to Open field. You can also enter a password in the Password to Modify field if needed.
- Choose Read-only if you want. This will put a "read-only mode" banner at the top of the document when opened but will not stop someone from making changes.
- Verify the password when prompted.
- Click OK, then save your spreadsheet.
PowerPoint (for .ppt, .pptx, and other supported file types)
Windows:
- Go to File, then select Info.
- Select Protect Presentation, then select Encrypt with Password.
- In the Password box, enter the password you want to use. Select OK.
- PowerPoint will prompt you to confirm the password by entering it once more.
- Save the file to ensure the password takes effect.
Mac:
- Go to File, then select Passwords.
- Under Password to open, select Encrypt this presentation and require a password to open.
- In the New password box, type the password you want to use.
- In the Verify box, type the password again, then select Set Password.
- If you want to require a password to modify, just repeat the steps above but choose modify instead of open.
- Click OK, then save your presentation.
7-Zip (for multiple files of any type)
- Install 7-Zip.
- If your computer is centrally managed, you can install 7-Zip from Software Center.
- Alternatively, you can download it from 7-zip.org.
- In File Explorer, select the files you want to zip.
- Rig/node/43651ht click on the highlighted files, select 7-zip.org, then Add to archive.
- Enter a name in the Archive field.
- Select ZIP Archive format.
- Enter a password in the Encryption section.
- Select OK.
Preview (for PDFs)
- Open the PDF you want to password protect with Preview.
- Go to File, then select Export, then Encrypt.
- Type a password, then type it again to verify.
- Save the file to ensure the password takes effect.
Keka Zip (for multiple files of any type)
- Install Keka from keka.io/en
- Open Keka.
- Choose ZIP format type.
- Enter a password.
- Select use AES-256 encryption.
- Drag and drop files into the Keka window.
- Enter Save as Name and Save Location, then select Compress.