If you have questions, experience problems with any equipment, or if you wish to reserve specialized equipment, please contact the OHIO Chillicothe It Help Desk.
Stevenson Center
T: 740.774.7212
T: 740.774.6079
OUC-HelpDesk@ohio.edu
All classrooms on the Ohio University Chillicothe Campus are equipped with screens or projection surface, video projectors, multimedia instructor station (computer, DVD/VCR, ceiling mounted speakers, audio amplifier, and digital presenter/document camera). Additional equipment is available upon request.
If equipment in your classroom is not working, please do not remove the equipment, attempt to service it, or remove equipment from another classroom; instead, please call the IT Help Desk for assistance: 740.774.7212 or 740.774.6079. Help Desk personnel will come to the classroom and resolve the issue.
Each classroom instructor cart offers a variety of equipment to ensure faculty have what they need to teach effectively. To ensure you can operate the equipment, we have created a guide to offer general instructions as well as instructions specific to devices within the cart.
To get started, familiarize yourself with the cart:
The DVD/VCR player is located inside the podium.
Please Note: DVDs may also be played using the CD/DVD drive in the computer.
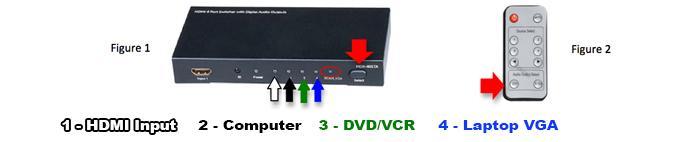
To operate a Laptop, connect the user-provided HDMI cable or the VGA and Audio cables located on the top of the cart near the Switch Box to the laptop.
The Epson Document Camera is located inside the drawer on the side of the instructor station
The Chillicothe Campus Computer Help Desk offers specialized classroom equipment, which can be reserved by faculty and staff for use in classrooms. Faculty and staff should request all specialized equipment at least 24 hours in advance to guarantee availability. Reservations are made on a first-come first-served basis.
There are three ways to put in a request to reserve equipment:
Mobile Laptop Instructional Carts are available to be delivered in Bennett Hall and the Technology and Business Development Center. If external laptop AC adapters are required, they can be checked out at the Help Desk by a faculty member for use during the equipment reservation.
Other equipment is available for reservation and can be checked out and/or picked up at the Help Desk.
A MELL cart offers 20+ PC laptop computers with a standard software configuration and internet connectivity. The MELL cart can only be reserved in its entirety and partial reservations cannot be honored.
A LET cart offers 20+ PC laptop computers with a standard software configuration and internet connectivity. The LET cart can only be reserved in its entirety and partial reservations cannot be honored.
Mobile Video Conferencing Carts are available for delivery in Bennett Hall, Stevenson Center and the Technology and Business Development Center.
Each cart consists of a 46" or 65" display, a computer with a wireless keyboard, mouse, wireless internet, and a Polycom conference webcam. Software on these systems includes Microsoft Office 2019, multiple web browsers and media players, Zoom, Teams and Google Hangouts.
Podcast/Instructional Recording Space is available for faculty in Stevenson Center 025. Equipment includes: 1 PC and 1 Macintosh computer, each with a YETI microphone in an isolated adjustable mount, webcam, digital presenter/document camera and WACOM tablet. Each computer has a standard software configuration, including Zoom, Teams, Panopto, Audacity and Windows Movie Maker.
Additional equipment options are available for reservation and can be checked out/picked up at the Help Desk.
If you have questions, experience problems with any equipment, or if you wish to reserve specialized equipment, please contact the OHIO Chillicothe It Help Desk.
Stevenson Center
T: 740.774.7212
T: 740.774.6079
OUC-HelpDesk@ohio.edu